Choosing the best Modular Power Cage in 2026 depends on more than its price or appearance. A cage must fit your training space, support your lifts, and work with the accessories you actually plan to use. A compact frame may suit a garage with low ceilings, while a wider setup can provide more room for pull-ups and attachments. Small measurements matter.
This guide compares key features that affect everyday use: frame dimensions, steel construction, weight capacity, hole spacing, safety options, and available accessories. It also considers assembly, adjustability, warranty terms, and how clearly manufacturers publish specifications. Those details can reveal practical trade-offs. A lower-priced cage might include fewer useful attachments, while a premium model may take up more room than expected.
There is no perfect choice for every lifter. Not even close. Product specifications and accessory compatibility can change, so verify current details with the manufacturer before buying. The strongest recommendation is one that matches your available space, budget, experience, and training goals—not simply the cage with the longest feature list. This comparison aims to make those differences easier to judge, while recognizing that published specifications cannot answer every question about long-term daily use. If a detail is unclear, treat it as something to confirm, not assume.
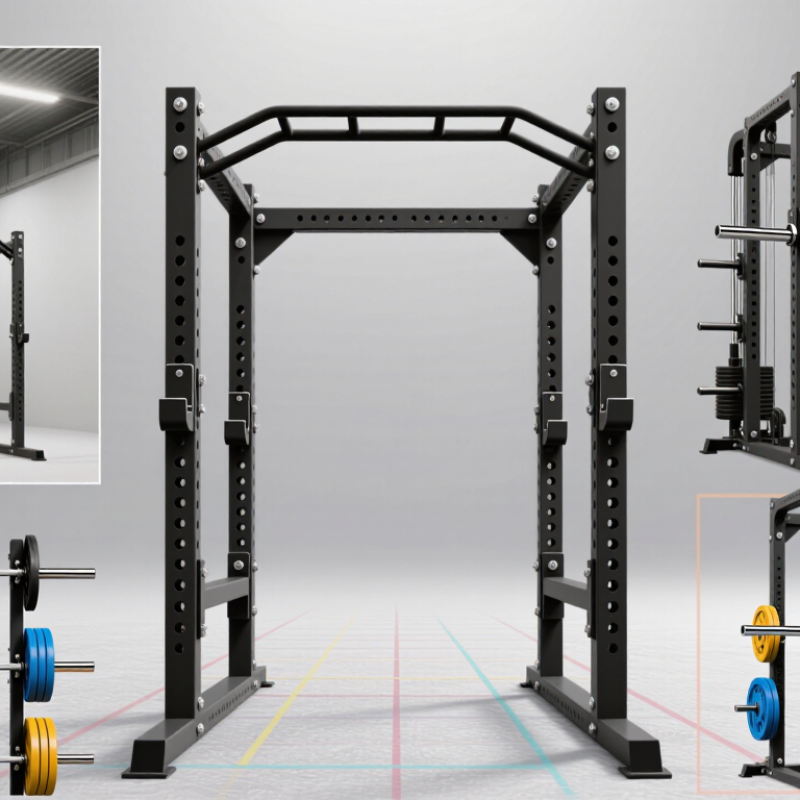
A modular power cage is a strength-training frame built from uprights, crossmembers, and interchangeable attachments. The main structure supports exercises such as squats and presses, while add-ons can include pull-up bars, dip handles, and cable units. Components connect through bolts or fitted holes, so the setup can change as training needs evolve.
That is the point. A lifter might start with a basic rack, then add storage pegs or a pulley system without replacing the whole frame. Before buying parts, check that their hole spacing, connection style, and weight ratings match the cage. These details are easy to overlook. A loose fit or incompatible attachment can make equipment unstable, so follow the manufacturer’s assembly instructions and inspect connections regularly. Secure the frame as directed, especially if it may tip during use.
Modularity saves space and can spread equipment costs over time, but it does not guarantee a better workout. Extra attachments need room, and frequent changes can mean more bolts to check. The trade-off is real. Measure your training area, including ceiling height, and leave space for plates and movement. A modular setup is most useful when its parts fit your actual exercises, not an imagined future routine.
| Configuration or Module | Typical Structure | Space and Setup | How It Works | Best Suited For | What to Check |
|---|---|---|---|---|---|
| Full power cage | Four uprights connected by upper and lower crossmembers, with safety bars or straps inside the rack. | Many home designs have a footprint in the general range of 4 × 4 to 4 × 6 ft (about 1.2 × 1.2 to 1.2 × 1.8 m). Actual dimensions vary. | Move the barbell’s J-cups and safety supports to the desired height using the upright holes. The four-post frame surrounds the lifting area. | Users who want an enclosed setup for squats, bench presses, pull-ups, and other barbell exercises. | Confirm the assembled footprint, ceiling clearance, rack height, and the manufacturer’s stated load ratings. |
| Half rack | Usually two main uprights with a stabilizing base or rear support; compatible safety arms extend in front of the uprights. | Often uses less front-to-back space than a full cage, but bar and user clearance still need to be included in the room plan. | J-cups hold the bar on the uprights. Safety arms catch the bar if a lift cannot be completed; their position can be adjusted for different exercises. | Training spaces where a smaller or more open layout is preferred. | Check that the rack is stable for its intended use and that the safety arms are designed to fit its uprights. |
| Wall-mounted folding rack | A pair of uprights and connecting members attached to a wall, with hinged sections that fold toward the wall. | Stores close to the wall when folded. The operating footprint depends on the rack’s width, depth, and the clearance needed for the barbell. | Unfold the frame and secure its braces or locking points before loading it. Fold it back only when it is unloaded and secured as directed. | Rooms that need floor space for other activities between workouts. | Wall attachment must be suitable for the building structure. Follow installation instructions and check required fasteners and clearances. |
| Adjustable safety supports | J-cups, pin-and-pipe safeties, safety bars, or fabric safety straps made for rack uprights. | Usually add little permanent floor space, but need adequate clearance inside or around the rack. | Supports are repositioned in the upright holes to match the exercise. They help hold the bar at a set height or limit its travel during a failed lift. | Users who perform lifts at different heights or want adjustable bar catches. | Check attachment type, upright dimensions, hole spacing, and the stated load rating for each support. |
| Pull-up bar or crossmember | A bar or connecting member mounted between the upper sections of the frame; styles may include straight or angled grips. | Does not usually increase the base footprint, but requires suitable overhead clearance and room to move. | The crossmember ties rack sections together; a pull-up bar also provides a fixed grip for bodyweight training. | Users adding pull-ups or wanting additional frame connections. | Verify mounting compatibility, usable grip width, and total ceiling clearance with the rack assembled. |
| Dip handles or landmine attachment | Removable handles or a barbell sleeve mounted to a compatible upright or base point. | May extend beyond the rack, so allow room for the user and moving barbell. | Dip handles provide parallel grips for bodyweight exercises. A landmine pivot holds one end of a barbell while the other end moves through an arc. | Users who want to add exercise options without installing a separate station. | Check the specified mounting location, compatible upright or base, and clearance during the full movement. |
| Cable or pulley add-on | A pulley system attached to the rack, sometimes using a weight stack or compatible weight plates. | Requires room for the pulley path, cable travel, and the user’s working position. | A cable transfers force through one or more pulleys, allowing exercises such as rows, pulldowns, or triceps press-downs, depending on the setup. | Users who want cable exercises from a single rack footprint. | Check the attachment instructions, cable routing, included components, and the stated capacity of the complete system. |
| Modular frame connection | Uprights, crossmembers, and accessories joined with bolts, pins, or purpose-built brackets. | Final dimensions depend on the selected parts and their arrangement. | Modules can be added, moved, or removed to change the rack’s layout. Compatibility is determined by the specific connection design and dimensions. | Users who expect their training needs or available space to change over time. | Do not assume parts from different systems fit together. Confirm hole size, hole spacing, upright dimensions, fasteners, and accessory compatibility. |
| Choosing a configuration | A modular setup combines a frame with only the supports and accessories needed for planned exercises. | Measure the room, ceiling, access route, and clearance around the bar before selecting a layout. | Start with the frame and safeties, then add compatible modules as needed. Modular construction does not mean every attachment is interchangeable. | Buyers comparing setups for home training in 2026. | Compare verified dimensions, installation needs, warranty terms, and published ratings. Load limits vary by model and component; there is no single universal rating for power cages. |
| Note: Dimensions shown are general planning guidance, not universal specifications. Always use the exact product documentation for fit, installation, compatibility, and load limits. | |||||
It is a strength-training frame with uprights, crossmembers, and interchangeable attachments. The cage can support squats, presses, and pull-ups. Components connect through bolts or fitted holes. Its layout can change as your training develops.
The main frame provides the structure for barbell exercises. Attachments add functions, such as dip handles, storage pegs, or cable units. Each part must match the cage’s hole spacing and connection style. A loose attachment can make the setup unstable.
Measure ceiling height, floor space, and bench clearance. Include room for plates and barbell movement. Leave walking space around the frame. Measure twice.
Build around the exercises you perform most often. Set safety arms or straps for your actual squat and bench positions. Store plates where they remain reachable but do not block movement. Extra parts can look useful and stay untouched.
Useful options may include safety arms, safety straps, pull-up bars, dip handles, cable units, and storage pegs. Choose attachments that serve your regular workouts. A long accessory list does not guarantee better training. Space matters.
Compare hole spacing, connection style, and weight ratings before purchasing attachments. Confirm that each component fits the frame securely. Do not assume similar-looking parts will connect correctly. This detail is easy to miss.
It can spread equipment costs over time and reduce the need for another frame. However, attachments still require storage and movement space. Frequent changes also create more bolts and connections to inspect. The trade-off is real.
Follow the assembly and anchoring instructions carefully. Secure the frame as directed, especially when tipping is possible. Recheck bolts and attachment connections regularly. I might skip this after a busy session, but that is a poor habit.
A Modular Power Cage is a configurable strength-training station built around a sturdy frame, with compatible attachments that let you adapt it to different exercises and routines. The best option for 2026 is not simply the largest or most feature-packed cage; it is the one that balances dependable safety, stability, suitable weight capacity, and room to expand. When comparing designs, consider frame construction, secure adjustment points, available accessories, and how much clearance the setup requires.
To choose the right cage, start with your training goals, available space, and the number of people who will use it. A compact configuration may suit a smaller home gym, while a more expandable setup can support varied training and future additions. Check that the cage fits your ceiling height and flooring, and plan where attachments and weights will be stored. Choosing thoughtfully helps create a practical, safe, and adaptable gym setup without paying for features you do not need.